Give Me A Brake!
With the MG still being fairly reliable (going to regret that as I'm off to Battlesbridge for a show on Sunday) I have had little to do to it. So my time has been used for making progress on my other project car. My Austin A40. The welding is now all complete other than a little grinding off and painting for the MOT mans approval. I still had the problem with the brake pedal pressure being lost over a period of time and difficulty bleeding the brakes.
I borrowed a vacuum pump from work as this includes an adapter to suck fluids through hydraulic systems. Perfect for brakes, he he. Connecting this up made bleeding the brakes an easy one man job. Afterwards the pedel felt ok but onstarting the car up ready to turn it round I actually had no brakes. I found an obvious problem fairly quickly. The pin connecting the pedal to the master cylinder rod had come out. Good job I was not driving the car then. This has now been replaced with a nut and bolt. However, after doing this I still had poor or no brakes. A quick look under the back of the car showed the frame cylinder to be operating. It had to be the fronts.
Off with the drums then. Although the brakes had been overhauled (probably about 8 years ago now) and the car having never left the garage, other than to move garage 3 times, the cylinders had seized. All four of them. I banged tapped levered and swore but to no avail. They would not budge and all I achieved was to break the casting of two of them.

Now I had a descision to make. Either repair the front brakes with four new cylinders, expected cost £20 each. Or invest a little extra and rebuild the midget front suspension and disc brakes I bought ready for a future upgrade. Well its a no brainer really and an order was placed for the bushes and bearings and brake callipers etc.
As I needed to keep the car rolling incase it needed to be moved I had to build up the suspension first ready for a quick swap over.
This photo shows the built up unit for the drivers side.
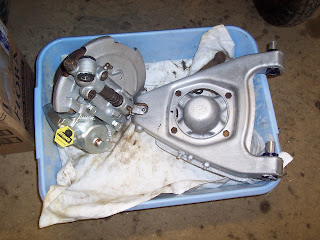
Compared to the old original parts that we later removed.

Well other than sheering off one of the lower wishbone bolts (a very bad incident especially as what happened was I accidently flicked the ratchet over to tightening and did not notice and actually tightened it until it broke) my excuse was because I was against the clock and kept getting distracted (I hope youve sorted those bloody brake lights out now Jon) and to think I used to work better under pressure.
Not a problem because I have a set of new bolts somewhere amongst my spares at home I just need to find them. A temporary bolt would do.
So with the new brakes and poly bushed suspension bolted on the passenger side the car was dropped to the floor.
Bugger, what on earth has gone wrong.
 My time was up for that day so other than cursing myself for not just buying the wheel cylinders and beginning to regret swapping the front end at this stage I had no time to look at the problem. Consider that this photo was taken while the drivers side wheel was pointing directly ahead. Too much positive camber and steering lock applied. Initial diagnosis. Lever arm (top arm) too long.
After sleeping on the problem and talking it over I came to the conclusion that once again I had buckled under the pressure and fitted the top trunion 180 degrees out thus making the top arm longer than it should be. This was confirmed my an MG specialist I emailed. Another case of more haste less speed.


So my next visit to work on the car began with first undoing what I had already done to correct this mistake. The positive camber was now gone although the only problem I see now is that the track is about 1" wider on each side. Given the wheel and tyres fitted I may have a clearance issue at the front as well as the back.
The lower wishbone bolts I had were found but turned out to be rear spring bolts so were of no use. I need to order the correct parts now.
To finish off the passenger side I needed to reroute the brake hose and pipe. This was quite straightforward as I made a pair of brackets to weld to the inner wing and the brake pipe was bent to bring it to the rear of the suspension. It does not look pretty but it will work for now.
 The final shot shows the new calliper through the nice 15" minilites. Just need to get on and sort the other side.
Well not quite. There is still the small matter of not being able to set the wheel bearing preload correctly. The hub nut is tight but there is still play in the bearing. This could well be my third and final personal cock up (well they say it happens in threes). After a lot of head scratching I (we, Jon) have come to the conclusion that if the bearings were installed in the hub back to front then no amount of tightening would put preeload on the bearings. My next job will therefore be to remove the bearings and check which way round I put them in. Other than that the spacer between the bearings must be too long preventing the inner races from being tightened onto the outers. We shall see.
posted by michael mjn @ 1:58 PM
0 comments
![]()
![]()


0 Comments:
Post a Comment
<< Home